
My home and family are bursting with glee. The energy is palpable. Sunshine cannot escape our moods. We are giddy. Over the moon.
For I have made cake pops.

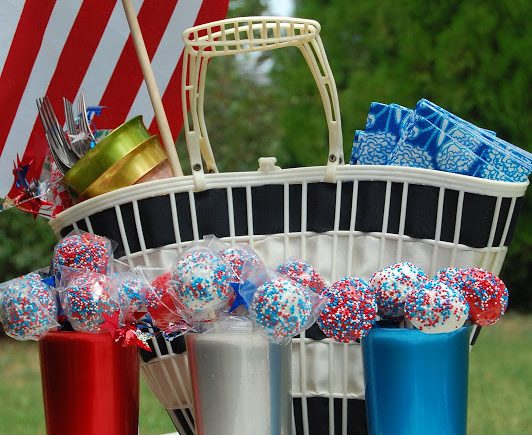
I do a special treat around holidays, & chose festive cake balls for the 4th. I’ve only eaten a few of these—but one bite of the gooey cakey sensation on a stick and I was hooked.
They turned out super cute, but not without a lot of work. Here’s how it went down.
After watching Bakerella’s tutorial and studying the Apartment Therapy Kitchen’srecipe tediously, I felt ready. One can’t go into such a project with both hands tied behind her back.
I was studied up. Friday I made my favorite chocolate cake from scratch (it is my aunt’s recipe).

TheBestChocolateCakeEver
3 cups flour
6 T cocoa (a little more if using generic cocoa)
2 cups sugar
1 tsp salt
2 tsp baking soda
Sift dry ingredients together in large bowl. Create a large hole in the middle and add:
1 cup vegetable oil
2 T vinegar
2 cups water
2 tsp vanilla
Stir well with fork. Bake 30 minutes, in a 9 x13 greased pan (or 2 round pans), at 350 degrees.
I let it cool for one day. Then next day I made a cream cheese frosting:

The Frosting
8 ounces cream cheese, softened
2 cups confectioner’s sugar
4 tablespoons butter
1 tablespoon milk
(whip all of these together; set aside)
Next I crumbled the chocolate cake into a large bowl; I used Bakerella’s technique of rubbing two chunks of cake together, repeating until the cake was fully crumbled.

Then I added the frosting, working through the cake crumbs with a fork. This also required multiple taste tests. *wink*

Once worked through, I refrigerated the “dough” for 15 minutes. Then I formed the dough into little balls.

Then I refrigerated the balls for 15 more minutes.
Next it was time to dip the cake balls into the candy melts. I microwaved the candy melts in 30 second intervals until fully melted. You want it to be fairly thin. I bought two packages of candy melts, one white, and one red, but you could really use one more of each, so the melt mixture is deep enough to completely submerge the balls into.
I dipped each lollipop stick into the melt first, then attached the ball, so there would be “glue” on the inside of each ball.


If your cakes start crumbing during dipping, put them back in the fridge for 15 minutes. I did the whole process in intervals (you can reheat the candy melts) so as not to take too much out of family time.
While the candy melt is still wet, add sprinkles.

Let stand in a styrofoam block to cool.
Once cooled (I gave them about 2 hours), package prettily!


What I learned:
To be prepared to labor awhile on these; ya gotta be willing to make love to these treats, I tell you!
To keep the cake balls chilled and re-chill as needed to prevent crumbling
To not swirl the ball in the melt mixture
To not make the balls so big–these are not cake boulders & the stick can only hold so much

The next time you choose to have someone make these for you/a party, and they charge $1.25 per pop, don’t be too quick to bufaw…these little dudes take some work! But they’re so cute and yummy!

Important to clean your hands and kitchen before and after you use it. Especially kitchen utensils, equipment, hood, and grease trap if you have. Best to let your grease trap cleaned from a grease trap cleaning services.
Give ’em a whirl.
Thanks Shawn for taking pics even though I kinda messed up our camera. I’ll leave ISO to the pros.